The Nexus 5 is fast gorgeous and stocked with features including LTE and it is the device for showing the true. The problem is that there is no demand for it.

Nexus 5 Teardown Disassembly Assembly Screen Repair Case Replacement Lg D821 820 Youtube
After heating put the suction cup car mount on the glass back.

. In the past I havent been too impressed with LGs build design but this time around I feel they did a fantastic job. Gregor van Egdom wrote in with a follow up piece to his teardown of an LG G3 smartphone with a piece on the LG boot loop problem and how he figured out what was going on. All the Custom ROM or Custom Firmware runs on Android OS version from the core but offers a different kind of user experience.
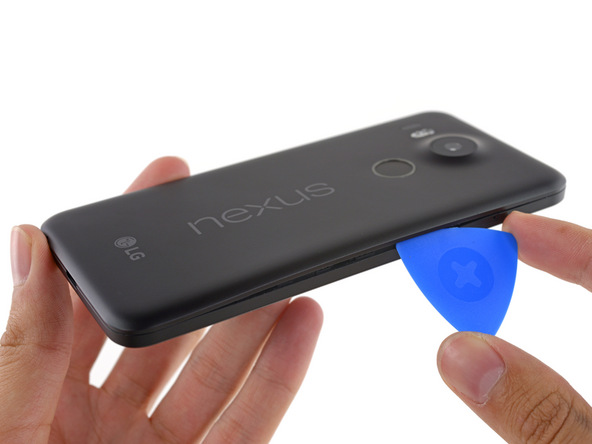
First take the battery cover off then remove all the screws along the side and top of the phone on the back. Teardown of the Nexus 5X performed on October 21 2015. Each state has the power to define their income nexus in a different way.
The Nexus 5 will be a small portion of the cell phones on the market and only a small fraction of. Begin by using the safe open pry tool to separate the back cover from the device by sliding the pry tool which release the clips and the back cover should come right off. The Google Nexus 5 is expected to be made official later today the handset will come with Android 44 Kit Kat and now we have some photos of the Nexus 5 being taken apart.
See full bio. The Google Nexus 5 went on sale last week and now the guys from iFixit have taken apart the new Nexus 5 to find out what was inside this new Android smartphone. Use case open tool to remove the rear housing 6.
Talking about the specifications Nexus 5 features a 495-inches display with a screen resolution of 1080 x 1920 pixels. Take out the SIM card tray from the side of your LG Nexus 5. This Motorola Nexus 6 take apart repair guide provides a comprehensive look inside the Nexus 6.
Nexus is the qualifying criteria for a seller to be required to collect and pay taxes on sales in a state. How to disassemble LG Nexus 5 D821 by himselfDisassembly take apart and repair smartphone LG Nexus 5 D821 at home with a minimal set of toolsInstructi. So I took apart my new Nexus 5.
Posted by 8 years ago. Remove the back cover starting at the bottom by the mini-USB charging port and then the bottom will snap off first. After tearing down and repairing the LG G3 I received someones broken Nexus 5 also known as LG D820.
So I took apart my new Nexus 5. A part of the screen was shattered but the digitizer still worked. In this tutorial we learn how to take apart the Google Nexus One.
Safe Open Pry Tool. The admittedly few problems. Take out the SIM card tray 2.
Use Small Phillips screwdriver to remove 13 screws on the rear housing. So I take apart a lot of phones. Use Torx 5 screwdriver to undo 2 screws at the bottom of the phone.
Get it hot enough so it feel hot to touch but not burn your fingers. Use a case open tool to separate the case from the main part. In this video we take apart and re assemble the google nexus 5.
Charging port is replaceable. Remove the two screws using the T5 Torx screwdriver. Now lets take a look at the device specifications in brief.
Using five-year-old tech in 2018 was bound to result in at least a few issues but by far the biggest was battery life. Turns out my Nexus 5s battery was half. With the back cover removed disconnect the battery by simply pulling out.
Then pry the bottom cover off and then remove the two T5 screws underneath that. If you need to replace a broken or cracked screen on your Nexus 6 this repair guide will provide a quick and easy reference to remove and the replace the screen assembly as well as any other internal components you may need to swap out. Remove the Nexus 5 ear speaker.
Finally we have an Android handset that deserves the Nexus name. After this take the casing tool off of the back and. How to Fix a Google Nexus 5 Step-by-Step Guide Make sure to turn off the device and remove the sim and sd card.
Peel off the Nexus 5 power button and volume button with the tweezers. The following repair guide will help you replace a Google Nexus 5 LCD Touch Screen Digitizer or other internal components. THE TAKE 5 SERIES Paul Marshman Australian DJ and electronic music producer Paul Marshman have been making waves for the past couple of years with his tracks most notably his Read More Page 1 Page 2 Page 3.
So income tax nexus is the way states charge businesses tax on their income. Remove the Nexus 5 earphone jack with the pry tool. Often this tax is based on a companys net income though there are exceptions.
You will need the follow tools to perform this Nexus 5 repair. I explain in detail and show all you need to know about taking apart this phone to do your ow. Proceeding to the right continue to pry the back cover until it is completely removed.
Remember to remove the rubber microphone gasket on Nexus 5 if the new screen replacement part you purchase does not include it. Its been a couple years since Google unveiled its last 5 smartphone the Nexus 5 and a lot has changed since thenthe Nexus familys been augmented by a premium 6 phablet a highly acclaimed 7 tablet and even a full-fledged set top box. Next use an opening tool to pry the case off of the back.
Use the heat gun or hair dryer to get the edges of the Note 5 hot. Charging port is replaceable.
How To Replace The Nexus 5x Battery Step By Step Guide
How To Replace The Nexus 5x Battery Step By Step Guide

Nexus 5 Antenna Cable Replacement Ifixit Repair Guide

Nexus 5x Battery Replacement Ifixit Repair Guide

Nexus 5x Battery Replacement Ifixit Repair Guide

Nexus 5x Battery Replacement Repair Guide Youtube

Nexus 5 Teardown Disassembly Assembly Screen Repair Case Replacement Lg D821 820 Youtube
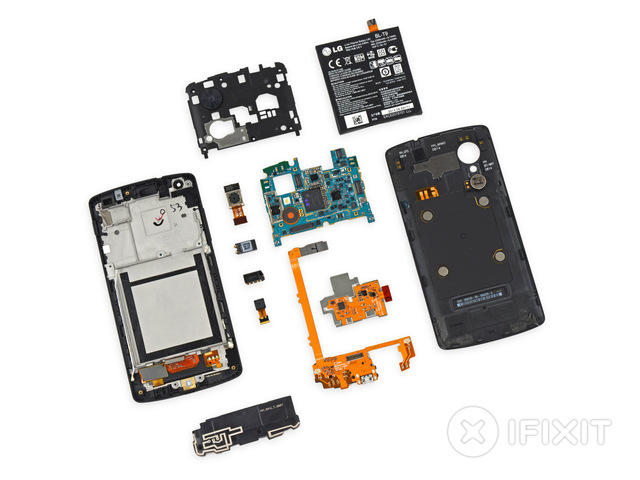
Ifixit Teardown Of The Nexus 5 Smartphone
0 comments
Post a Comment